


This guide is meant to introduce you to Zoom and how to use it. For more details, please go to the Zoom Help pages.
Getting Started
Using Zoom is very similar to using Skype. We prefer Zoom because it seems to handle weak internet connects better than Skype.
To use Zoom you will need:
- a video camera, either built in to your device or a separate webcam (most modern computers, smartphones and tablets have this built in)
- a microphone, either built in to your device or in the webcam (most modern computers, smartphones and tablets have this built in), or a phone
- a broadband internet connection
- the Zoom client installed on your machine. (Zoom has clients for Windows, Mac, iOS and Android.)
We also encourage you to sign up for a free Zoom account. Let us know if you don’t have video capability and would like advice on getting webcam.
The easiest way to get started
When someone invites you to a Zoom call, they will likely send you a link that looks like https://zoom.us/j/1010101010 (not a valid link – for illustration purposes only).
If you are using a laptop or desktop computer and don’t have the Zoom client yet, when you click on the link the client will automatically download and then connect you to the call. If you already have the client, you will just be connected to the call.
This usually works well but it takes a little time to go through the installation process, which may feel awkward if you are trying to be on time for a call. You may prefer to do the installation manually before the call. If you will be using smartphone or tablet, you will need to do the manual installation.
The manual way to get started – which is almost as easy
If you are using a laptop or desktop computer, go to https://zoom.us/download#client_4meeting where you can download the client for your machine. Install it the way you would install any software.
If you are using a smartphone or tablet, go to the iOS App Store or Google Play, search for ZOOM Cloud Meetings and download the app. We encourage you to do this even if you are primarily using a computer – your phone or tablet serves as a useful backup.
Having the client installed before your first call assures you of a smooth start. Whichever path you take is a matter of personal preference.
Setting up a free account
You can be a guest on a call without any account but you need an account to host a call. We encourage you to sign up for a free account so that you can host calls, like for your triad.
You can sign up for a free account at https://zoom.us/signup .
Free accounts are actually quite feature rich. The main limitation with the free account is that group calls are limited to 40 minutes. This is more of an embarrassment for professionals than a true limitation since you can always just re-initiate the call after the 40 minute cutoff.
You can see the features of the free and paid accounts at https://zoom.us/pricing
Joining A Call As A Guest
The call host has sent a link
If the call host sends you a link that looks like https://zoom.us/j/1010101010 (but with a valid meeting ID – the nine, ten or eleven digit number at the end of the link), just click on the link and you can join the meeting.
Using the Join dialog box
This next method is helpful if you don’t have a link and either know the meeting ID or are joining a call to a host you’ve called before. (The meeting ID is the Zoom equivalent to a “phone number” for the host. You will need it one way or another to connect – in the link or as a number or stored in the client from a previous call.)
Open the Zoom client software before joining the meeting. A panel will appear that looks like this:
Click on the big turquoise button called “Join,” which will open a dialog box that looks like this:
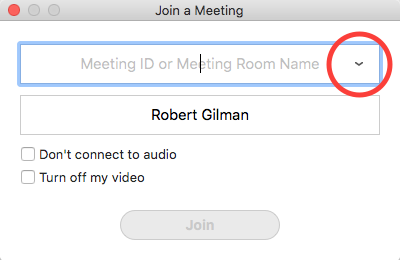
Enter the meeting ID if you have it or use the down-arrow (shown here in the red circle) to reveal a list of previous calls.
You can change your name that will identify you in the call in the second text box.
Click Join and the video screen will open. Choose your audio connection and you are ready to go.
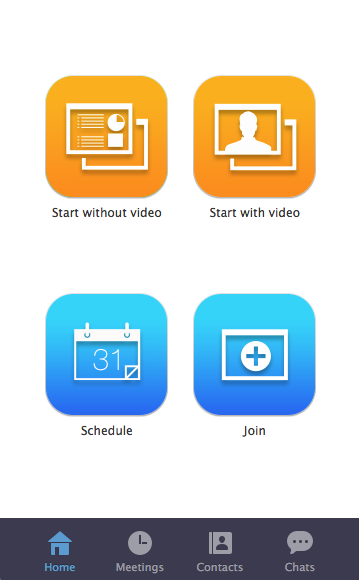
Initiating A Call As A Host
If you are going to be the host for a call, you can start the call by clicking on the orange button called “Start with video.” The video screen will open. Choose your audio connection and you are ready to go.
Participating In A Call As Guest Or Host
Choosing your audio connection
When the video screen first opens, you get a dialogue box that looks like this:

Most of the time you are likely to want to choose Join Audio by Computer. Just click the button.
If your computer or webcam doesn’t have a microphone or if your internet connection is unstable, you can get your audio through a phone:
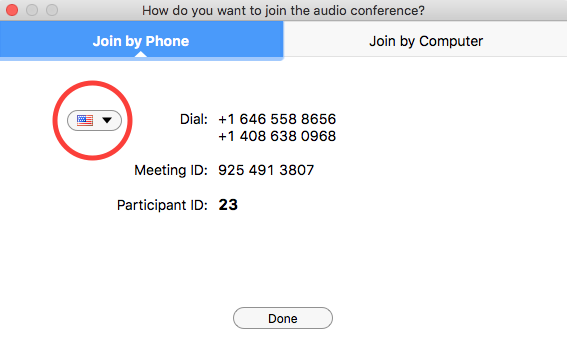
The popup with the flag (here shown inside the red circle) gives the number(s) to call for your country.
The Interface
When you move your mouse over the video window, a toolbar shows up at the bottom of the screen. Moving from left to right:
Audio and Video
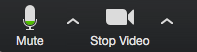
In the lower left corner of the screen you will find a microphone icon and a video camera icon.
You can use the microphone icon to mute your audio (helpful in group meetings). The upward arrow (^) to the right of it will open a popup menu with various audio settings and choices depending on your hardware.
You can use the video camera icon to turn off your video (helpful if your internet connection is weak). The upward arrow (^) to the right of it will open a popup menu with various video settings and choices depending on your hardware.
Central Buttons

In the center of the bottom of the screen are a series of buttons that allow you to
- invite others to the call
- see who is participating on the call
- share your screen for others to see
- open the chat panel
- record the call (with the host’s permission)
Please explore each of these buttons to see what they do. For more details, please go to the Zoom Help pages.
Leave or End Meeting
In the lower right corner is a button that allows you to leave a meeting (if you are a guest) or end the meeting (if you are the host).

for guests
or

for hosts
Speaker and Gallery Views
![]()
In the upper right is button that toggles back and forth between
- Speaker View, where the video of the current speaker fills most of the screen and the video of the other participants is in small thumbnails at the top of the screen
- Gallery View, where the video for each participant is the same size.
Speaker View works well when the call involves up to four people. Gallery View works well for larger groups.
Tips and Troubleshooting
The biggest problem we’ve run into with using Zoom (or any online conferencing system) is weak and intermittent internet connections. Here are some things you can do if you are having this issue:
- Quit any other programs, like browsers or mail programs, that might be using bandwidth in the background.
- If you are using WiFi, ensure you are getting a strong signal by moving closer to the WiFi base station.
- If you are sharing your internet connection with others, ask them to minimize their usage while you are on the call.
- Use the phone for the audio connection.
- Try turning off your video.
- Try your smartphone or tablet for the connection instead of a computer.
- If you do file or photo sharing with some online system, start your computer well before the call so that any synchronization can complete before your call.


